All the yoga poses which I am sharing in this post helped me to relieve my lower back pain over the years. I remember those painful days clearly and, I now know how healthy body suppose to feel and I appreciate my day by day without it.
Those yoga poses helped me to build strength in both lower back and stomach muscles. Additionally, after while, I have incorporated more poses to build the strength in overall body and, also I focused on eliminating as much stress as possible. The brain and the nerves inside the spine make up the central nervous system – all is connected in our body. So for the overall well-being we need to tackle and work on as much on physical level as on mental. For those additional yoga poses, keep checking in in the next month.
For now, if you have been suffering with lower back pains or sciatica and have not managed to try yoga yet, these 10 chosen yoga poses should really help to relieve the pain.
10 Yoga Poses for relieving lower back pain
Extend your arms forward and up while sitting on the chair

One day I woke up and I found that this pose with extended arms forward and up while sitting on the chair really helped me. Helped me to lengthen my spine and simultaneously have created a space in my spine while breathing in the pose.
Sit with your sit bones on your chair. Do not lift your tailbone. Keep pressing down towards your chair. Knees place above your ankles, heels pressing down to the floor. Big inhale and as you exhale extend your arms forward towards the wall. You need a support for this pose. So a wall is ideal. If you not feel much in lower back while extending your arms then lift them higher – using your exhalation – until you start feeling the extension in your space and most importantly – a space in your spine. Deep breath again and extend your arms higher if possible. Do it mindfully, all needs to happen from your lower back – lumbar spine to feel space and lengthening effect. Give yourself 5 breaths there. Play with an extension of your arms. For some might be too much to extend arms completely. Slight bend in your elbows could make a massive difference.
Concentrate on breath – deep inhale and exhale while in the pose and, visualise the healing in your lower back.
Cow Pose – Bitilasana

Famous Cow and Cat. So let’s start with the Cow pose.
Come to table position or table top. Keep hips above your knees and shoulders above your wrists. Relax your shoulders and gently press with palms of your hands with fingers widely spread towards your mat. Feel connected to your mat. Gently lift as well so there is not too much pressure on your wrists. Big inhale, as you exhale lift your head towards the ceiling ( whatever feels comfortable and possible for your neck ) and look up. Your abdomen drops towards the mat, send energy forward through your sternum and tailbone tilt up towards the sky.
Working with synchronised movement of Cow tilt to Cat stretch.
Cat Pose – Marjariasana

As you exhale, round your back, navel draws towards your spine, scoop your tailbone, gaze towards your nose, relax your chin towards the chest and relax your shoulders. You can repeat as many cat and cow movements as you like and visual as energy circulates throughout your spine starting from your lower back towards your neck and head to help create fluidity in the body and help to awaken the chakras.
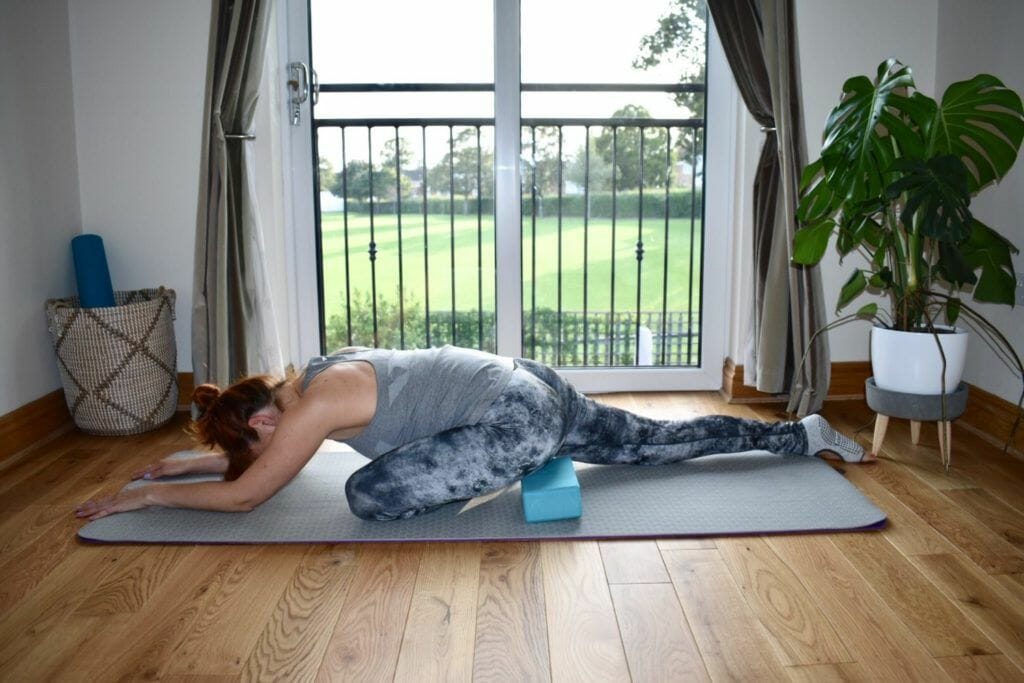
Puppy Dog Pose – Uttana Shishosana

One of my favorite pose. This pose is between child pose and downward facing dog. I feel totally relaxed after this pose and my spine feels lengthen without much effort.
When you finish your energising cat and cow, keep your hips above your knees as they are. Only start extending your arms forward and your forehead place gentle on the mat. Lengthen the arms forward in front of you. ( if there is any pain or discomfort in your elbows or have any injuries, lower your elbows down on the mat. Don’t over extend it. Only extend what really feels good ) Keep your hands align with your shoulders. While you are in the pose, think of your breath, deep inhale in your lower back, visualising flowing the energy through your spine, your neck and shoulders and, continue to let your chest melt towards the floor. It is the pose for you to stretch your upper back, shoulders and spine. Stay there for 3-5 breaths. Be mindful as you come out of the pose. Go gentle on yourself.
If your head is too far from the floor, use yoga block to help you to reach it. Nothing like your good friend – yoga prop.
Downward facing dog – Adho Mukha Svanasana

Who would not like “the” downward facing dog. it is not easy pose get into especially at the beginning but once you start feeling the benefits – you will stay daily in downward facing dog for few breaths.
From your table top or puppy pose, ( as above ) tuck your toes and lift you knees away from the mat. Keep them bend and, draw your chest towards your thighs. Begin to straighten your knees but make sure that your spine is not compromise. You can bend your knees as much as you need to just keep your spine straight. From your inner ankles, draw your inner legs up into the groins. Arms in front of you align with your shoulders. Fingers widely spread and palms of your hands firmly onto the mat. Shoulders relax and keep them away from your ears. Draw your shoulder blades towards into your upper back ribs and broaden across your collarbone. Rotate your thighs inwards as you continue lift your sit bones high. Sink your heel towards the mat. If you notice your back start rounding, lift your heel back up to keep your spine straight.Gaze between your legs or between your navel. Stay in the pose for 3-5 breaths and, with each exhalation, and with small micro movements lengthen your spine even more.
Extend your leg towards the ceiling while lying on your back

Lie down on your back and, bend your knees so they are above your ankles. Keep left foot bended onto the mat and right foot straighten towards the ceiling. Support the leg with your hands behind your knees. Keep your bended knees in the centre of your left hip. Deep inhale, as you exhale push your right leg gently towards your chest. Breath 3-5 breaths there and change the sides.
If you need a support to hold the leg, a belt or strap is a wonderful prop to use. Read on my previous post how to use in Reclining hand to big toe pose . Keep the leg straight towards the ceiling while breathing in the pose or turn the leg outward from the hip join so the knees and toes facing right and slowly lower the leg and keep few inches above the floor. 2-3 breaths there and then try to the other leg.
Your hamstrings will love you for it and, your lower back after practicing this pose will get better.
Eye of the needle pose

We also known this pose as Reverse pigeon pose. You are lying on your back and bend your knees. Lift the right leg and place on top of the left knee. Extend your arms and reach under your knees or on the side of your thighs. Make sure your shoulders stay on the mat, your head and neck is relaxed. If you are lifting in this pose with your shoulders and head because you can’t reach the leg, use the strap. The strap would go under your left leg. Make sure your arms is extended and shoulders keep relaxed on the mat. Once you find a comfortable position, deep inhale and as you exhale gentle push your left thigh towards the chest. Stay there for 3-5breaths, release your hands, lower the legs and swap the side.
Pigeon pose – Kapotasana
We call this pose – ‘King of the hip opener’. When your hips experiencing tightness around your hip flexors, you might also start experiencing lower back pains. Pigeon pose is extremely effective hip opener tackling your psoas muscles – the primary hip flexor which connects torso and legs that gets shorten as we get older and also in our sitting-chair society.
Come to table top position. Right leg extends and your toes point towards the back of your mat. Your left leg bends and bring your left knee towards your left wrist. Depends on your body, it could be just behind your left wrist, see what feels good for your body. Feel the stretch on your outer hip without discomfort your knees. Your left ankle somewhere in front of the right hip. Don’t drop your left hip on the floor, support with a block under your left hip to keep your hips parallel to the mat.
At this point, your arms are still straight and extended in front of you. Inhale, find a space in your spine, lengthen the spine and as you exhale, lower your torso to the floor. You can lie on the cushion, bolster for a support or if feels good around your left groin, extend your arms and allow yourself to let go closer to the floor with a support of your forearms or completely extend them. Stay there for 3-5 breaths and swap the sides.
Give yourself a big hug by bending the knees and press towards the chest – Wind release pose

The greatest pose to relieve back pain.
Lie down on your back and bend the knees towards your chest. Give yourself a nice, big hug. Keep your spine and your tailbone printed on to the mat while you are giving your self hug and, tuck your chin towards your chest. You should feel lengthening the spine and release tension on your lower back. Stay there for good 5 breaths and you can move your knees gently from the right to the left.
Supine spinal twist – Supta Matsyendrasana

So from hugging your legs, drop your knees towards your left. Your right arm extend shoulder width and right arm gently grab under your left knee from the top. You can gently pull your left knee towards your shoulder for better stretch. make sure your right shoulder is on the mat and, if you have no tension in your neck, keep your gaze opposite direction of your knees. Alternatively, when there is a neck tension, you can always look straight to the ceiling. If legs does not reach the floor, place cushions, bolsters under them for a support and keep your right side of your shoulder and right shoulder blade on the floor.
Stay in the pose for 3-5 breaths and swap sides. You should feel a lovely stretch on your lower back and, release in any tension there is.
Hope you enjoy those chose few asanas.
For anyone who is at the beginning of their yoga journey might have a lots of questions. Some poses are easier to get into but some need more support. Some poses might be easier for some and other poses will be more difficult – and, vice versa. It is all because a difference in our anatomy, skeleton structure, our biomechanics. All is in consideration and, I am here to support you. If you have any questions, please do get in touch.
I also offer One to One Personalised Yoga sessions where we can focus totally on you and your needs. Please see more details on the One to One page and please let me know if you like to try it out.
Love and light and, relief in lower back.
Julia xx